Godox TT685s and X1Ts for Sony Mirrorless Cameras

A few years ago, I invested in a Godox TT685s flash unit, a TT350s flash unit and X1Ts transmitter for my Sony A7III camera. Despite their potential, I rarely use them, leading to some forgetfulness about configuring their wireless transmitters. A helpful YouTube video brought back memories of the necessary settings, including the requirement that the channels used for communication between devices must match. I also remembered there was an irritating issue about them, but I couldn’t quite recall what it was.

Before a party, I tested the flashes on our Chihuahua, Diego, placing one on the floor and the other on a window sill. Both worked flawlessly, and I was excited to use them that evening. Diego is a very patient subject, sometimes anyay.

My willing test subject, Diego.

Later on, I got my camera out, successfully made a photo or two of one group, then headed to the kitchen. However, while trying to photograph the beautiful desserts there, the flash refused to fire, even after several attempts. I resorted to aperture priority mode with auto ISO, managing to snap a few shots without the flash’s assistance. Despite the hiccups, I was able to capture images.

I went around to different groups to take photos, but to my dismay, the flash wouldn’t fire as expected, leaving me to apologize for my failed attempts. Fortunately, after numerous attempts, the flash worked, but the experience was disconcerting. Eventually, I resorted to attaching the flash to the camera and was relieved when it worked perfectly. Because of the complications, I was grateful to have captured some memorable shots.

While troubleshooting why my Godox TT685s flash didn’t fire, I scoured the internet for answers. Amidst various suggestions, I stumbled upon a StackExchange post that revealed the true reason behind the problem: the Godox X1Ts transmitter and the TT685s flash were positioned too closely to each other. I remembered it was the same vexing issue that had slipped my mind earlier!

Godox added a “close mode” to their transmitters to address the issue of the X1Ts transmitter and the TT685s flash being too close to each other. While it’s unclear to me why this would affect radio signals, it’s good to know there’s a solution. A firmware update may be needed for the X1Ts, but my device has the latest one (v18). To activate this feature, hold down the TEST button while powering on the transmitter until the status light blinks for 2 seconds. The setting will reset when the device is turned off. After trying this out, I can confirm that it worked flawlessly.

I don’t use flashes much. In the future, if I encounter that same non-firing issue with my Godox X1Ts transmitter and TT685s flash, I hope I’ll remember to check my own blog first to avoid the hassle of researching it elsewhere. Hopefully, my own documentation will come in handy and save me time in the long run!

GraXpert fixes your Astro shots

Hot off my RSS feeds is GraXpert which I found through this Fstoppers article. It corrects colour tints and gradients in astrophotography shots. I don’t do much astrophotograpy:

  1. late nights
  2. cloudy nights
  3. clear nights are cold

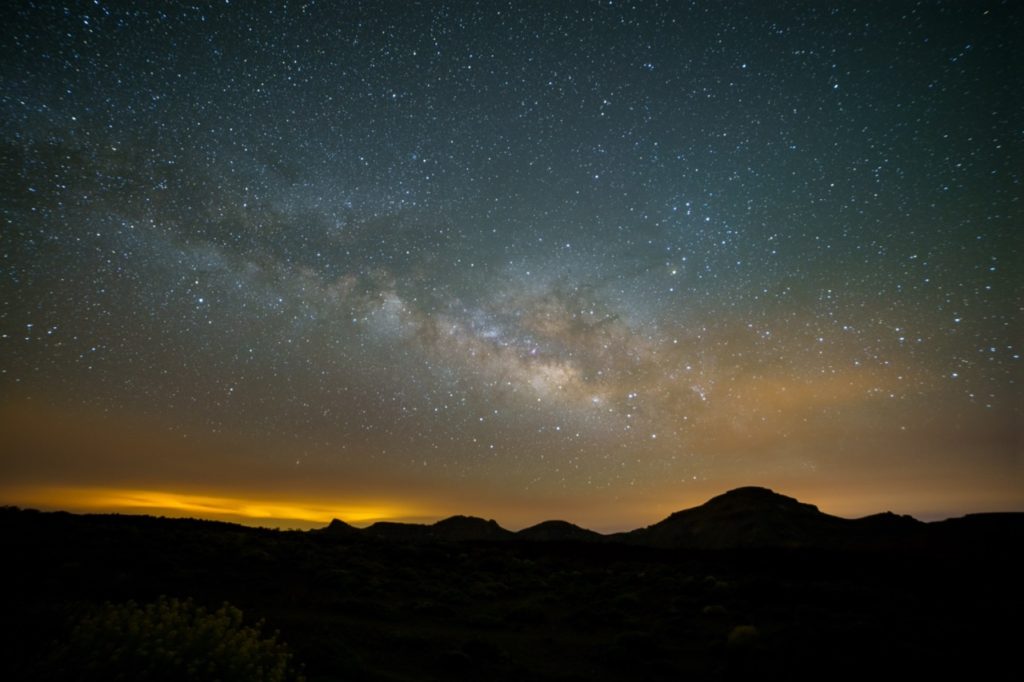
But when I do, I get colour tints from nearby towns and cities, or I add it myself thinking it looked better. I’m still very much a newbie when it comes to this sort of thing. Anyway, here is a Milky Way photo I took in Tenerife last year. I thought it came out pretty well, despite my attempts to make it look better.

The Milky Way, viewed from the volcano on Tenerife Island.

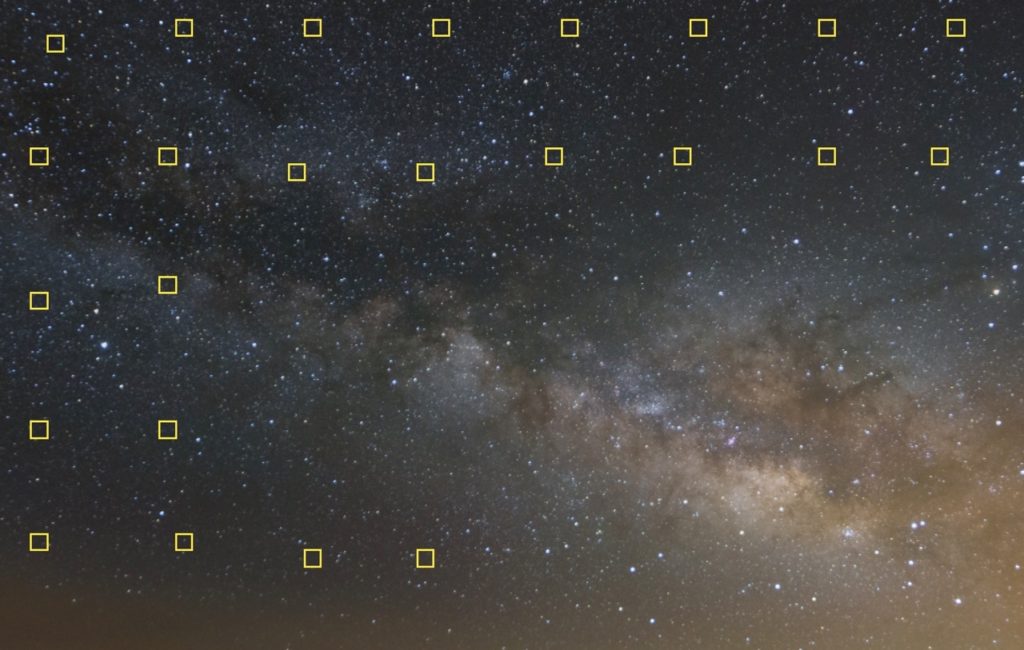
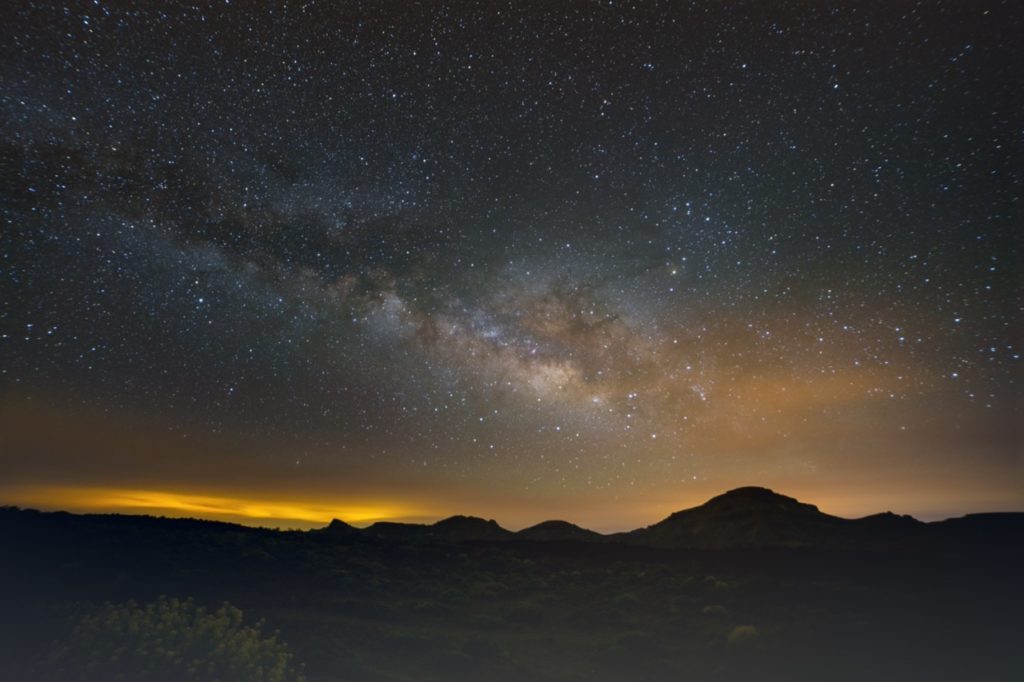
From March to the end of August is the best time to shoot the Milky Way in Ireland, and I have to admit I rarely ventured out to try this sort of photography since taking that photo in Tenerife. So, when I read about GraXpert that was the photo that sprang to mind. I loaded the original tiff file into it, pressed the “Create Grid” button, and then hit the “Calculate Background” button. I’m rather pleased with the results!

The GraXpert Grid
The Milky Way, viewed from the volcano on Tenerife Island.

I did no other work with this, which is why you can see the foreground, but even so, it got rid of that green colour cast in the sky.

GraXpert is free, open source software. It’s not a plugin of Lightroom or Photoshop, but it’s easy to generate a TIFF file for Photoshop from Lightroom, and then open it in an external programme. It’s definitely worth a try if you have any astro photos you need to work on.

TIL to search date ranges in Google Photos

I learned something new about Google Photos. I can examine the photos taken between two dates by entering :YYYYMMDD-YYYYMMDD in the search box.

I have images going back more than twenty years in Google Photos so a way to view a selection of those images is really useful!

St Patrick’s Day, 2019

I haven’t been using Google Photos as much since they added space limitations, but this search will still be useful!

Save space by resizing Google Photos

On the 1st of June 2021, Google Photos stopped offering free storage.

Google Photos is a fantastic service, but at the rate I take photos I knew I’d fill the remaining gigabytes of storage in a matter of months, so I stopped uploading photos from my phone.

I don’t regard Google Photos as a backup system for my photos. I use Backblaze for that, where everything is backed up from my desktop computer. Google Photos is very useful for sharing albums, the face recognition is amazing, and utilities like HDR photo generation and time lapses are nice bonuses.

In Lightroom, I would resize images to 16MP before uploading them to Google Photos. Those files are still huge compared to what you really need. They are likely only going to be seen on a screen, either phone or laptop. So recently I started to resize them to 1280 pixels on the longest side. Instead of a 6,000Kb file, I now upload a 600Kb file. On my phone screen it looks much the same, and I have the original on my computer anyway!

What I really wanted is for my phone to resize the images I shoot and then allow Google Photos to upload them. It would have to do something like this:

  1. Check the DCIM/Camera directory for new photos, and move them to a work directory.
  2. Go through those images, resize them and copy the location EXIF data from the original images.
  3. Save the resized images to a new directory in DCIM where Google Photos will back them up.
  4. Some time later, those resized images should be deleted when we’re sure they’ve been backed up.

With the help of Tasker, an Android app, I was able to do that, and more. Tasker is a tool that lets you automate tasks on your phone. It can do simple things like enable screen rotation when Google Photos or Lightroom are launched. Or it can disable your Wi-Fi if you leave the house.

First, the bad news. The Tasker app costs money, and it’s complicated to use. However, it’s not expensive and there are lots of public Tasker projects on their Taskernet website, which means you probably won’t need to delve into the complexity of it. Much.

Over the course of a few weeks I figured out how to program Tasker to do what I wanted, and if you look at my Taskernet Profile you’ll see the result of that work. The final work on copying the EXIF data took me three hours on the train back from Dublin, and then a hint on Reddit to complete.

The Resize Images for Google Photos Tasker profile does exactly what it says. It moves new photos out of the way, resizes them, and copies the location data to the new files. The original files are moved to Download/jpeg. Finally, it saves the resized images back in a DCIM directory, where Google Photos will find them and upload them.

Every time a photo is taken, it checks if any existing resized photo is more than 7 days old and deletes it, which should be more than enough time for it to be uploaded to Google Photos.

It also moves MP4 files out of the way to Download/jpeg because MP4 files can be huge! You could resize those with Handbrake on your desktop machine before uploading to Google Photos.

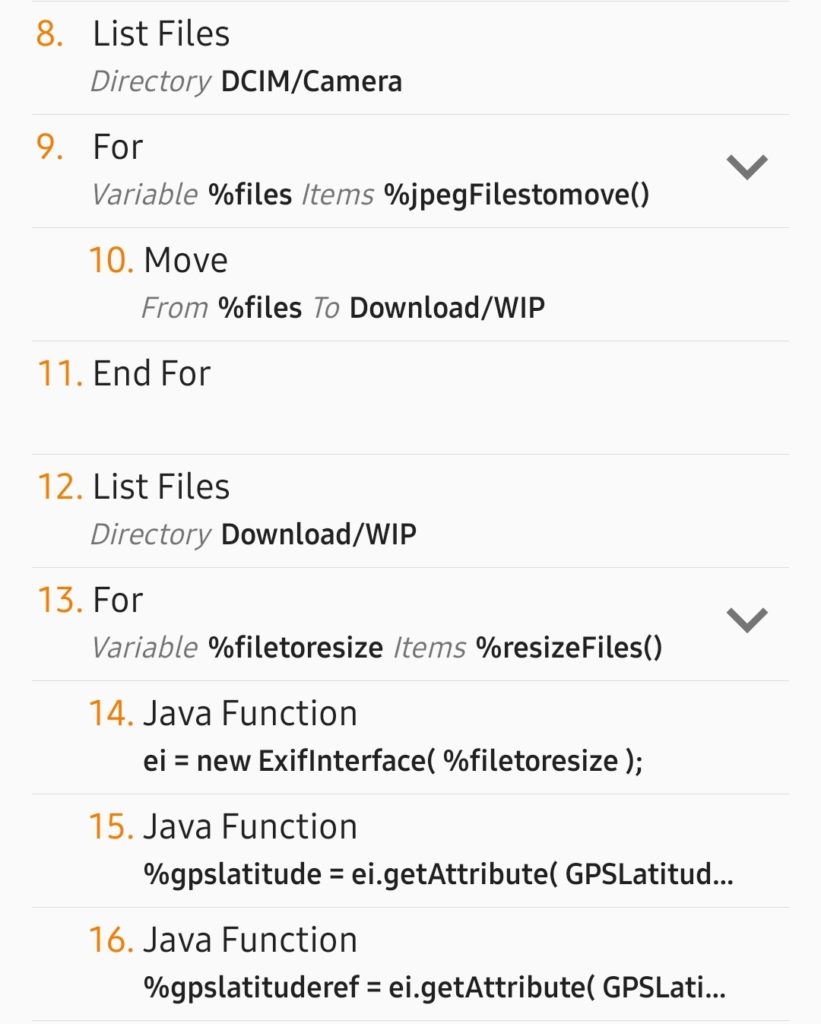
Tasker task source code

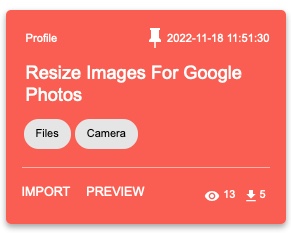
You install it through Tasker itself or by loading this blog post on your phone. Tap on this Resize Images for Google Photos link, which will bring you to Taskernet. You can also find it by searching for the tags, Files and Camera.

Read the description, and please make a backup of your photos first. Tap Import and Tasker will load. A warning about the commands used now shows.

It does execute Java code, but that’s only to copy the EXIF data to the resized images. It uses shell commands to move files around or delete thumbnails and old files.

When it asks for the profile, just tap on Base, if you don’t have any others. If you are worried about running unknown code on your phone, don’t enable it. Take a look at the “Resize Jpeg Files” task. You can see all 39 lines of code.

Some notes on implementation:

  • The profile monitors the DCIM/Camera directory for new files. If your favourite camera app puts photos somewhere else, they won’t be found.
  • Some paths are hard coded. The ExifInterface library requires a filename. It expects that the Resized directory is in /storage/emulated/0/DCIM/. If it isn’t there, edit line 25. Three shell commands run at the end and use /sdcard/DCIM/. That should be edited too if necessary.
  • Photos are moved to Download/WIP to be resized.
  • After resizing, they are saved to DCIM/Resized.
  • Photos are resized to a maximum width of 1280px, so portrait orientation images will be bigger.
  • Your gallery app will show the resized images as duplicates unless you can hide the Resized directory.
  • The gallery in your camera app is going to show broken images. Your favourite gallery app may not even show the images. I find the Piktures app regenerates the thumbnails properly, but the Samsung and Xiaomi gallery apps don’t. Neither does Google Photos, so if anyone knows how to fix that, I’m all ears!

This might seem like a lot of trouble to save some space in my Google account, but this is something Google could have done themselves. Sure, they have the storage saver setting. That resizes large photos down to 16MP but, even saved in WebP format or something, the files are fairly big. It was an itch I had to fix. Besides all that, Tasker is a very powerful tool that I wanted to use more!

My photos don’t stay on my phone. I use Syncthing to synchronise a few different directories with my desktop machine. Every few days I import them into Lightroom. Importing them moves them, and being removed from the Camera directory is synchronised back to the phone, so the photos are deleted from the phone. From Lightroom they’re backed up in various ways. I actually run a small shell script to move photos taken by various apps into one directory, and check if duplicate DNG/Jpeg files exist, but that’s a topic for another blog post.
Drag the Lightroom Histogram

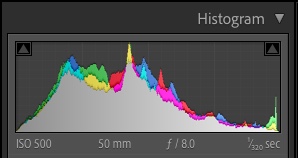
I discovered yesterday (or maybe rediscovered?) that you can drag the histogram in Lightroom to adjust the exposure of a photo.

From right to left, these are the sliders affected when you drag:

  • Blacks
  • Shadows
  • Exposure
  • Highlights
  • Whites

It can appear like a blunt, inaccurate tool to modify the exposure of a photo, but do it at least once, and you’ll get a better appreciation for what the histogram actually displays.

Originally shared on Mastodon yesterday.

Adjust the time on your camera for daylight saving

If you’re in this part of the world, then daylight savings means the clocks went back an hour last weekend. Your phone adjusted itself, as did some other gadgets, but your oven probably didn’t, and your camera almost certainly didn’t update either.

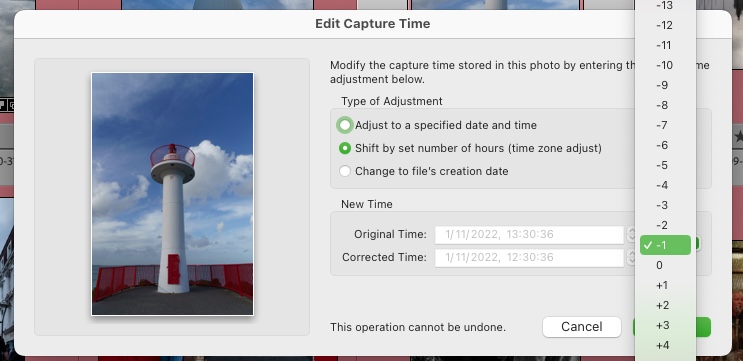
I couldn’t possibly describe how to fix the time on your camera, but on my Sony A7III I was able to disable “daylight savings time” and the time was corrected. I need to switch it back on next Spring, of course.

If, like me, you forgot to do that on Sunday morning, or even worse, you’re in the USA where they switched a few weeks ago, you can use a handy tool in Lightroom to fix the time on any photos you took. It’s in Metadata->Edit Capture Time… and you can adjust the time on multiple photos at a time.

Good thing too, as I had to adjust the time on several hundred photos.

Of course, if you’ve been travelling to another timezone and forgot to adjust your camera time, you should use “Edit Capture Time” to fix the time on those photos too. Years later, you’ll wonder why photos taken at noon are pitch black, and it wasn’t an eclipse…

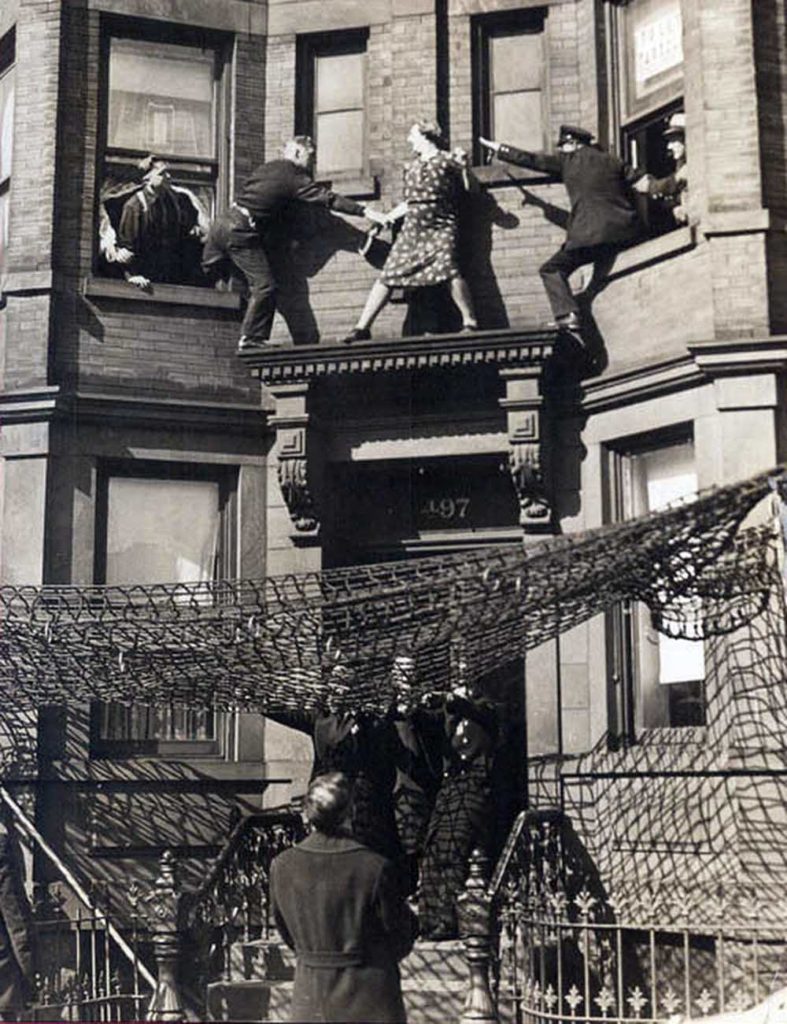
Edna Egbert on the Ledge

Well, I bought several books recently. They’re all photography books, but I wanted to share one photo from the book I bought yesterday.

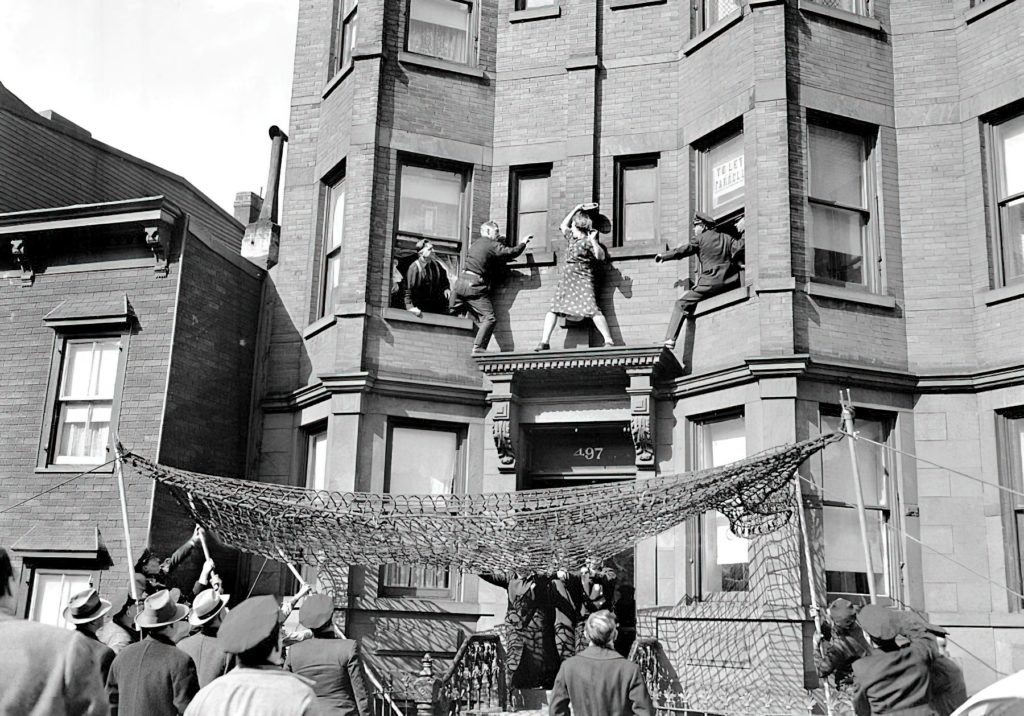
Edna Egbert on the ledge, No. 497 Dean Street. 1942.

The book is New York exposed : photographs from the Daily News, and you can read it online on archive.org or buy it in a few places if you search for it.

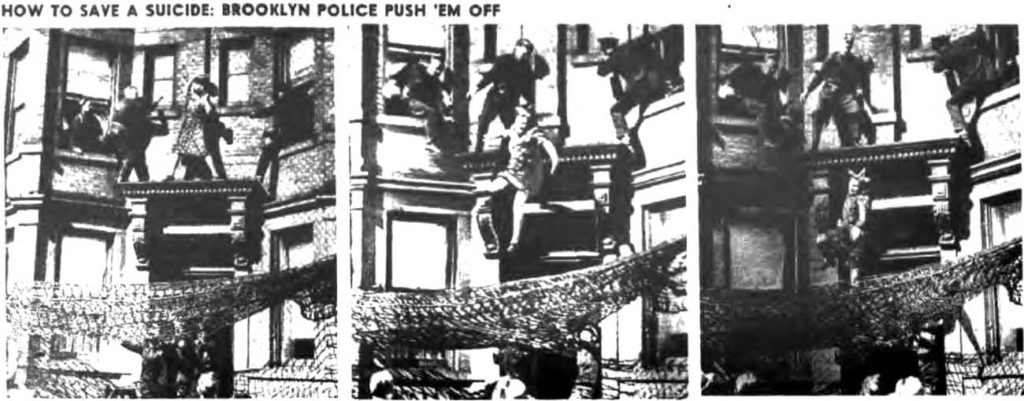
When I flipped through the book in Vibes & Scribes this photo was the first one I saw and immediately grabbed me. It totally looks staged, but Edna’s son, Fred, got married, joined the army, and had not written to his mother since, and she was distraught! I don’t know if she could have killed herself landing on the steps of that house, but there were sharp spikes on the railings if she had jumped far enough, so who knows? It was a cry for help.

A policeman kept her talking for 25 minutes while others rigged a net.

As officers Ed Murphy and George Munday tried to persuade her to come back into the building, she brandished a mirror and started swinging it at them. The police grabbed her arms and she proceeded to sit on the ledge.

600 people gathered to watch. The police tried to persuade her to come in the window, but she either jumped or was finally pushed to fall safely in the net.

According to census records, Mrs. Egbert was either 42 or 44-years-old, not 50 as noted in every article about this story. Her husband John Egbert was 64 and their wayward son Fred was 20. Whatever became of Mrs. Egbert and her non-writing son Fred is unknown.

The book is full of other great photos, some you’ll recognise and descriptions to explain what’s happening. Borrow it for an hour on archive.org and take a look through it.

Lightroom Classic does not have access to some Standard folders.

I have found a brand new error in Lightroom that doesn’t appear in search engines yet. It started happening after the update today. There are similar error messages reported on the Adobe forums, but not this one.

Unfortunately, the “Learn More” link goes to a URL that quickly changes to https://helpx.adobe.com/lightroom-classic/help/allow-permissions.html which shows a 404!

It appears the entire https://helpx.adobe.com/lightroom-classic/ directory is showing a 404 now. I guess they really do want to get rid of Lightroom Classic.

Anyone know how to fix this one?

Edit: the next morning it looks like Adobe have fixed their site and the documentation above is live!
For unknown reasons, that warning dialogue has gone away. The only major change was updating to macOS 12.5.1. If you see the error, “Lightroom Classic does not have access to some Standard folders.” then hopefully updating macOS will do the trick, but the documentation is now working and suggests going into Systems & Privacy to give Lightroom Classic more access.

The old Nik Collection is still free

After the sunset, edited in Silver Efex Pro 2

Nik Collection 4.0 was announced recently but comments here say that if you have a previous version it always shows an update warning that can’t be turned off.

Within a couple weeks of usage, I received the on-screen notification when launching the software below telling me to update. However, clicking on that “Install Now” button neither downloads nor installs a software update but instead, takes me back to the DxO website and prompts me to purchase brand new software.

If you’re curious, the original Nik Collection that was made free by Google in 2016 still works. You can grab it on Mac and Windows from this page at archive.org.

Google Photos ends free storage tomorrow

That photo taken today is a helicopter rotor

Google Photos will start counting your uploads against a storage limit from tomorrow. Make sure you upload anything you’ve been meaning to upload in the next few hours!

Also go into your shared albums and click the “Save photos” button if you want “local” copies of any photos shared with you.

I’m sticking with Google Photos. The ease of sharing photos and AI search make it worth while, but I will be disabling automatic upload off my phone. I take too many snapshots that I don’t care enough about to pay for them.