Save space by resizing Google Photos

On the 1st of June 2021, Google Photos stopped offering free storage.

Google Photos is a fantastic service, but at the rate I take photos I knew I’d fill the remaining gigabytes of storage in a matter of months, so I stopped uploading photos from my phone.

I don’t regard Google Photos as a backup system for my photos. I use Backblaze for that, where everything is backed up from my desktop computer. Google Photos is very useful for sharing albums, the face recognition is amazing, and utilities like HDR photo generation and time lapses are nice bonuses.

In Lightroom, I would resize images to 16MP before uploading them to Google Photos. Those files are still huge compared to what you really need. They are likely only going to be seen on a screen, either phone or laptop. So recently I started to resize them to 1280 pixels on the longest side. Instead of a 6,000Kb file, I now upload a 600Kb file. On my phone screen it looks much the same, and I have the original on my computer anyway!

What I really wanted is for my phone to resize the images I shoot and then allow Google Photos to upload them. It would have to do something like this:

  1. Check the DCIM/Camera directory for new photos, and move them to a work directory.
  2. Go through those images, resize them and copy the location EXIF data from the original images.
  3. Save the resized images to a new directory in DCIM where Google Photos will back them up.
  4. Some time later, those resized images should be deleted when we’re sure they’ve been backed up.

With the help of Tasker, an Android app, I was able to do that, and more. Tasker is a tool that lets you automate tasks on your phone. It can do simple things like enable screen rotation when Google Photos or Lightroom are launched. Or it can disable your Wi-Fi if you leave the house.

First, the bad news. The Tasker app costs money, and it’s complicated to use. However, it’s not expensive and there are lots of public Tasker projects on their Taskernet website, which means you probably won’t need to delve into the complexity of it. Much.

Over the course of a few weeks I figured out how to program Tasker to do what I wanted, and if you look at my Taskernet Profile you’ll see the result of that work. The final work on copying the EXIF data took me three hours on the train back from Dublin, and then a hint on Reddit to complete.

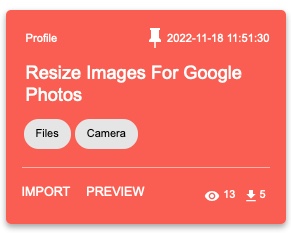
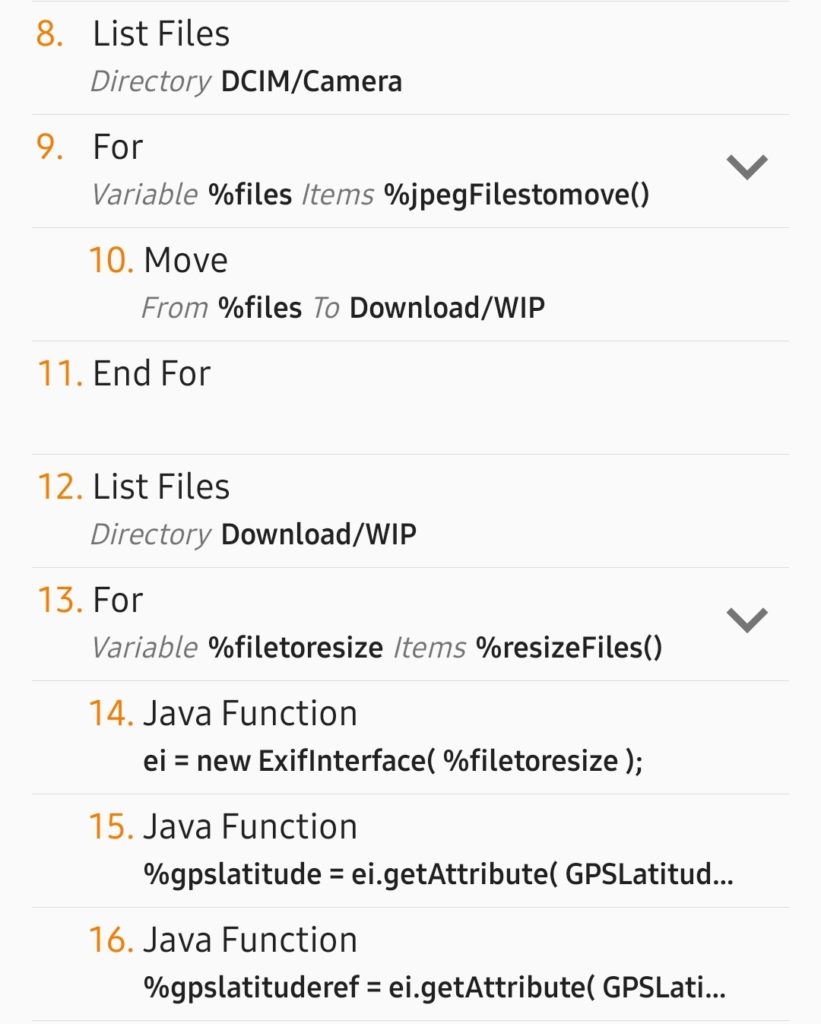
The Resize Images for Google Photos Tasker profile does exactly what it says. It moves new photos out of the way, resizes them, and copies the location data to the new files. The original files are moved to Download/jpeg. Finally, it saves the resized images back in a DCIM directory, where Google Photos will find them and upload them.

Every time a photo is taken, it checks if any existing resized photo is more than 7 days old and deletes it, which should be more than enough time for it to be uploaded to Google Photos.

It also moves MP4 files out of the way to Download/jpeg because MP4 files can be huge! You could resize those with Handbrake on your desktop machine before uploading to Google Photos.

Tasker task source code

You install it through Tasker itself or by loading this blog post on your phone. Tap on this Resize Images for Google Photos link, which will bring you to Taskernet. You can also find it by searching for the tags, Files and Camera.

Read the description, and please make a backup of your photos first. Tap Import and Tasker will load. A warning about the commands used now shows.

It does execute Java code, but that’s only to copy the EXIF data to the resized images. It uses shell commands to move files around or delete thumbnails and old files.

When it asks for the profile, just tap on Base, if you don’t have any others. If you are worried about running unknown code on your phone, don’t enable it. Take a look at the “Resize Jpeg Files” task. You can see all 39 lines of code.

Some notes on implementation:

  • The profile monitors the DCIM/Camera directory for new files. If your favourite camera app puts photos somewhere else, they won’t be found.
  • Some paths are hard coded. The ExifInterface library requires a filename. It expects that the Resized directory is in /storage/emulated/0/DCIM/. If it isn’t there, edit line 25. Three shell commands run at the end and use /sdcard/DCIM/. That should be edited too if necessary.
  • Photos are moved to Download/WIP to be resized.
  • After resizing, they are saved to DCIM/Resized.
  • Photos are resized to a maximum width of 1280px, so portrait orientation images will be bigger.
  • Your gallery app will show the resized images as duplicates unless you can hide the Resized directory.
  • The gallery in your camera app is going to show broken images. Your favourite gallery app may not even show the images. I find the Piktures app regenerates the thumbnails properly, but the Samsung and Xiaomi gallery apps don’t. Neither does Google Photos, so if anyone knows how to fix that, I’m all ears!

This might seem like a lot of trouble to save some space in my Google account, but this is something Google could have done themselves. Sure, they have the storage saver setting. That resizes large photos down to 16MP but, even saved in WebP format or something, the files are fairly big. It was an itch I had to fix. Besides all that, Tasker is a very powerful tool that I wanted to use more!

My photos don’t stay on my phone. I use Syncthing to synchronise a few different directories with my desktop machine. Every few days I import them into Lightroom. Importing them moves them, and being removed from the Camera directory is synchronised back to the phone, so the photos are deleted from the phone. From Lightroom they’re backed up in various ways. I actually run a small shell script to move photos taken by various apps into one directory, and check if duplicate DNG/Jpeg files exist, but that’s a topic for another blog post.

Long term review: Sony Ericsson W810i phone

Sony Ericsson W810i

A year ago I pondered buying a Sony Ericsson K750i but eventually bought it’s big brother, the Sony Ericsson W810i instead. At the time I was impressed, especially with the panorama function of the camera, but I’ve grown to loath this piece of technology in the year since I bought it. Here’s why.

  • “Message waiting, Too many messages. Delete some from any folder. Delete now? Despite the fact there’s a 512MB memory stick plugged into the side, the phone can only store about 130 text messages. My old Nokia 7650 spoiled me. I rarely deleted any text messages but this phone is always on the brink of being full. That’s a problem I can accept, except it’s buggy. For some reason the phone checks the sim card memory and asks me to delete messages from there too, even though messages are delivered to phone memory. That is very annoying.
  • Keyboard Lock – during a call the Menu button becomes the End Call button. After finishing a call, if the other party hangs up first and I don’t hit “End Call” fast enough it reverts back to the Menu function. Hitting that brings up the main menu of course. On a Sony Ericsson, the keyboard lock sequence is “*” “Menu”. See where I’m going? To lock the phone I need to exit the menu and then hit that sequence of keys. Why couldn’t you just copy what Nokia do with their “Menu” “*” sequence? It just works better.
  • Walkman – I have no use for the Walkman function. That’s my own fault for picking the wrong phone, but it had a good camera, integrated radio and the price was right. What I can complain about is the too-prominent position of the Walkman button. It’s way too easy to click.
  • Durability – the phone seems to be quite delicate. For the most part it sits on my desk, but about a month ago while out, it slipped from my hand. Since then the phone hasn’t been itself. At random, it will reset and a message appears on screen about an inactive sim card. I need to remove the battery to restore it.
  • Meteor, my phone company, decided in their wisdom that the first two items on the phone menu would cause the phone to go online. The first link went to their homepage before I changed it to my own blog and the second is a generic “Meteor WAP” icon. To prevent the phone accidentally going online I dug through the preferences and now clicking those icons brings up a username/password form. Much better than potentially expensive GPRS bills.

On the plus side, sound quality is good, battery life is ok. Camera is excellent for what it is. Images are noisy, but it’s packed full of features. I love the panorama function. The included memory stick makes it easy to copy files to and from my PC or Mac.

Would I buy a Sony Ericsson phone again? If they had a sensible keyboard locking sequence, then maybe. As it is, I’m going back to Nokia. For my next phone I would like a bog-standard device that makes calls, can store hundreds of texts, has at least a 2MP camera and a memory card.
Any suggestions?

Roaming in America

One of the problems with traveling is the cost of calling home. I enabled roaming on Meteor, but it’s a bit pricey at €1.39/minute or €0.32/sms. I checked roam4free as well but that appears to be more expensive yet at €2.50/min.

Enter Skype where I can buy credits and call an Irish landline for €0.02/min or Irish mobile phone for €0.184. It’s great as everywhere in San Francisco I’ve traveled to has WiFi access. This morning I roamed about the house with my laptop in hand, headset on and spoke to my wife Jacinta for over 18 minutes and it cost me less than €4. That’s pretty cool and it was great to hear her and baby Adam.

It’s not quite the same sort of roaming but WiFi is fairly ubiquitous in the United States, so Skype on my laptop is painless, and very cheap.

Later … Out of curiosity I checked how much it costs to ring a mobile phone from an Irish landline. I use UTV’s service and Skype is cheaper at all times except for the weekend. Crazy stuff!

My Meteor – why don't you work in Firefox?

There’s only 3 mobile phone companies in Ireland, Vodafone, O2 and Meteor. I’ve been a customer of each and am currently with Meteor. That might change however as their newly redesigned meteor.ie website doesn’t work properly in Firefox. They offer 300 free texts from their site but when one hits the “SEND” button nothing happens.
If you’re a Meteor user mail info@meteor.ie with your phone number and your PIN, or 3 phone numbers you’ve rung in the past month (for verification).
Ask them politely to fix their website so it works in Mozilla Firefox! The Javascript error I get is,

Error: window.smsForm has no properties
Source File: https://www.mymeteor.ie/mymeteor/phone_book/send_sms.cfm
Line: 295

Oh, and last time I checked, Vodafone’s website offers 300 texts a month and it did work in Firefox.
Later – Niall suggested entering your text message, phone number, and instead of hitting “SEND” copy and paste the following code into the URL address bar and press return: javascript:window.document.smsForm.submit();
Now how hard is that for Meteor to fix?

Linux to Symbian File Transfer – HOWTO

I finally got to see my phone’s filesystem from Linux this morning! I used p3nfs to connect my Nokia 7650 and Red Hat 9 Linux box. Here’s how.

  • Login to your Linux box as root.
  • Make sure you have the following rpms installed: bluez-libs-devel, bluez-libs, bluez-utils. They’re available from your local apt-rpm repository (just apt-get install them!) or from http://bluez.sf.net
  • Copy the following lines to your /etc/modules.conf

    # bluetooth stuff
    alias net-pf-31 bluez
    alias bt-proto-0 l2cap
    alias bt-proto-2 sco
    alias bt-proto-3 rfcomm

  • Start Bluetooth services: /etc/init.d/bluetooth start
  • Create the bluetooth device if it doesn’t exist: mknod /dev/rfcomm0 c 216 0
  • Create a directory for the mobile to be mounted on: mkdir /mnt/psion
  • Download p3nfs from the site above. Copy the nfsapp for your phone to your phone (you’ll have to mail it to your phone, wap, or bluetooth in Windows.)
  • p3nfsd doesn’t compile on Red Hat 9, but it’s simple to fix that. cd into the nfsd directory, edit “mp_mount.c” and remove any mention of extern int errno from it and add #include <errno.h> at the top of the file. Do the same in “mp_xmit.c” and compile using make clean;make
  • Follow the instructions in README.bluetooth.linux (find the BDADDR, bind to the device, and start the nfs app and servers.
  • cd into /mnt/psion and look around your phone!

This is in fact more useful than the Windows tools I have. I couldn’t send images from my phone to my desktop software, and there’s quite a few of them. Using this, I simply went into /mnt/psion/C:/Nokia/Images/ and “mv”ed the files onto my PC!
There’s an “Installs” directory there too so I presume that’s where the .sis and .jar files go to install applications. Will test later. /me’s happy!
This howto wouldn’t have been possible without the invaluable page Tom wrote about his own experiences. Thanks! And of course Google helped me compile p3nfsd!