If you haven’t seen 1917 yet you should go see it before watching this parody set in 2020. It’s so good, but only makes sense if you saw the original movie.
“Donald Trump got impeached?”
….
….
“And everyone forgot already?”

If you haven’t seen 1917 yet you should go see it before watching this parody set in 2020. It’s so good, but only makes sense if you saw the original movie.
“Donald Trump got impeached?”
….
….
“And everyone forgot already?”
Lightroom Classic comes with 20GB of space on Adobe’s cloud service (Lightroom CC/Web/app) but did you know that you can sync photos to the cloud and then edit them on your phone without using that space?

The original photos are not synced, but a smaller cut down smart preview is which in most cases will be indistinguishable from the original.
If you create a collection, all the photos in that collection can be synced with the cloud. They’ll appear as an album of the same name in the Lightroom app on your phone or iPad. They won’t take up any of that valuable 20GB of space. Right-click on the collection and click “Sync with Lightroom”. You can also click the checkbox to the left of the collection name.

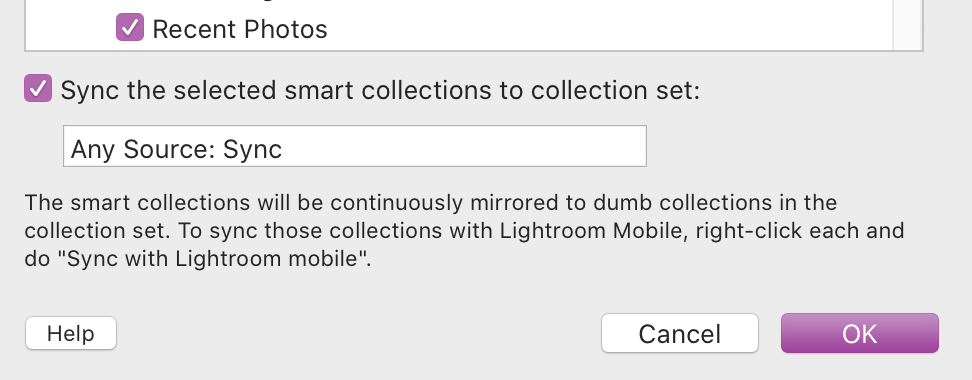
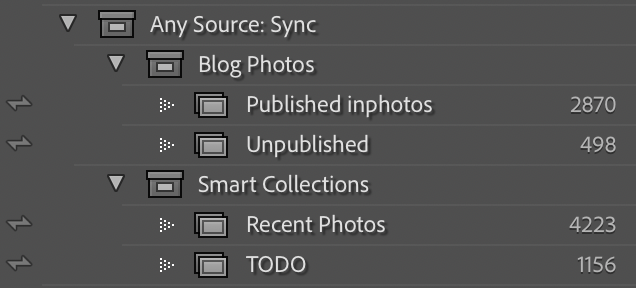
Unfortunately Adobe won’t allow you to sync smart collections, and I presume that is intentional for whatever reason. However, with the help of the Any Source plugin you can configure it to sync smart collections with the cloud. This very handy plugin syncs the smart collection with a dumb collection that can then be synchronised.

I use it to synchronise the following smart collections:
The plugin has a free trial but is PWYW and well worth paying for!

Syncing my recent photos with the cloud is simple.
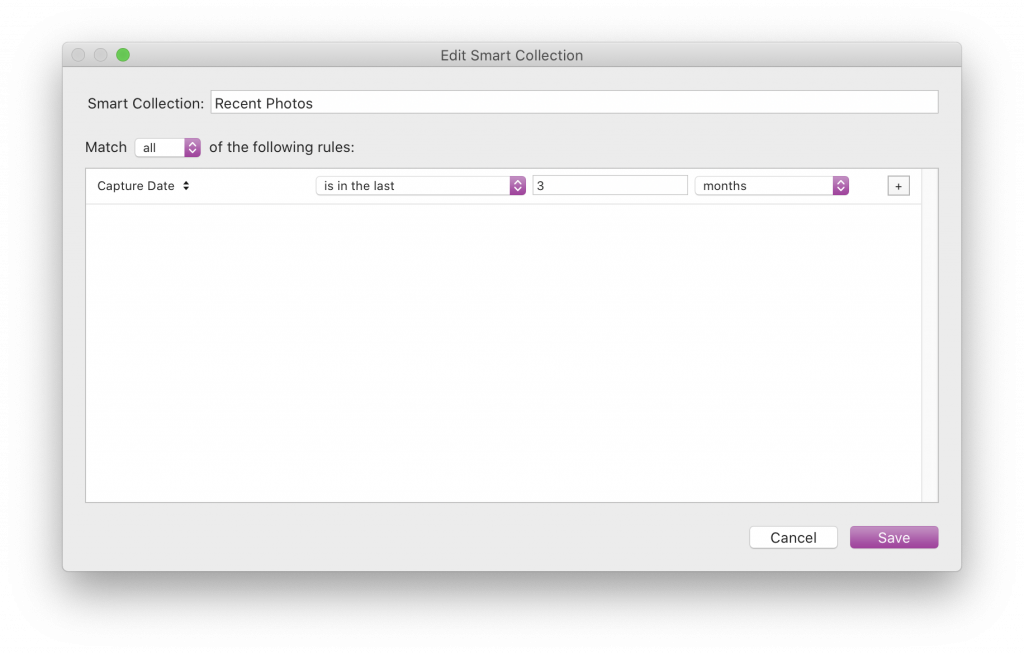
That will create your new smart collection. Now follow the instructions to synchronise smart collections on the Any Source homepage. It might take a few minutes for the album to appear in mobile Lightroom but it will eventually.
I’ve been running a photoblog at inphotos.org since 2005 on WordPress. (And thanks to writing this I noticed it’s 15 years old today!)

In that time WordPress has changed dramatically. At first I used Flickr to host my images, but after a short time I hosted the images myself. (Good thing too since Flickr limited free user accounts to 1000 images, so I wrote a script to download the Flickr images I used in posts.)

For quite a long time I used the featured image instead of inserting the image into the post content, but then about two years ago I went back to inserting the photo into the post. Unfortunately that meant the photo was shown twice, once as a featured image, and once in the post content.
The last theme I used supported custom post types, one of which was a photo type that displayed the featured image but hid the post content. It was an ok compromise, but not perfect.

Recently I started using Twenty Twenty, but after 15 years I had a mixture of posts with:
I knew I needed something more flexible. I wanted to hide the featured image if it also appeared in the post content. I procrastinated and never got around to it until this evening when I discovered it was actually quite easy.

Copy the following code into the function.php of your child theme and you’ll be all set! It relies on you having unique filenames for your images. If you don’t then remove the call to basename(), and that may help.
function maybe_remove_featured_image( $html ) {
        if ( $html == '' ) {
                return '';
        }
        $post = get_post();
        $post_thumbnail_id = get_post_thumbnail_id( $post );
        if ( ! $post_thumbnail_id ) {
                return $html;
        }

        $image_url = wp_get_attachment_image_src( $post_thumbnail_id );
        if ( ! $image_url ) {
                return $html;
        }

        $image_filename = basename( parse_url( $image_url[0], PHP_URL_PATH ) );
        if ( strpos( $post->post_content, $image_filename ) ) {
                return '';
        } else {
                return $html;
        }
}
add_filter( 'post_thumbnail_html', 'maybe_remove_featured_image' );
The post_thumbnail_html filter acts on the html generated to display the featured image. My code above gets the filename of the featured image, checks if it’s in the current post and if it is returns a blank string. Feedback welcome if you have a better way of doing this!

99.999999% of my readers can probably ignore this one, but if you are of the small minority who use Rsync and have Mac and Linux computers in your home you’ll want to read this.
I have Plex running on a Raspberry Pi for my music. I have a large mp3 folder. Too large to run Syncthing on it unfortunately, but an occasional rsync is perfectly fine.
I thought it worked fine until I quickly realised it was syncing the same files over and over again. It turns out the Mac and Linux machines I’m using have different ideas about character sets their filenames are stored in. A file with an accented character on the Mac is completely different to one that looks the same on the Linux box.
The solution took a while for me to find but it’s very simple. Rsync has an option named --iconv to convert between character sets!
The solution was embarrassingly simple: Much due to a comment I read when researching the problem, I thought you were supposed to specify the character set in the order of transformation; but it seems as that is not the correct syntax. Rather, one should always use
--iconv=utf-8-mac,utf-8when initialising the rsync from the mac, and always use--iconv=utf-8,utf-8-macwhen initialising the rsync from the linux machine, no matter if I want to sync files from the mac or linux machine.Then it works like magic!
EDIT: Indeed, sometimes, checking the manual page closely is a good thing to do. Here it is, black on white:
--iconv=CONVERT_SPEC
              Rsync  can  convert  filenames between character sets using this
              option.  Using a CONVERT_SPEC of "." tells rsync to look up  the
              default  character-set via the locale setting.  Alternately, you
              can fully specify what conversion to do by giving a local and  a
              remote   charset   separated   by   a   comma   in   the   order
              --iconv=LOCAL,REMOTE, e.g.  --iconv=utf8,iso88591.   This  order
              ensures  that the option will stay the same whether you're push-
              ing  or  pulling  files.